2017年2月28日火曜日

Blocks and how to start a quest

So now you know whats inside the ship, but you might be wondering why there's no other players around me, or even in my screenshots. It is because I am in a block with no players in it.

If you want to join other players for quests or meet them for chatting you need to be in the same block as them, and I will show how and what you need to pay attention of each block. Blocks in PSO2 all have their designated purposes, and if you want to do something you will have to be in the right block to do so.

To change your block, get into the lift the same as going to "My Room". Which should be green in color.
 Get in and press E to call out the menu. The orange bars are how full the blocks are, and the panel on the center is the description of the block, and the bar below it is premium space for that block, which only premium users(players who paid a monthly fee)can enter.
Blocks 001 and 002 are for Beginners but the chat there is weird so avoid it even if you are one.
The other main blocks are for different difficulties for quests.
003 for normal
004 and 005 for hard
006 and 007 for very hard
008 to 011 for super hard
012 to 016 for extra hard
017 to 037 for experts who had earned a title for clearing a solo quest
Note that you also need a license and meet the level requirement to play on different difficulties, and you get those from Koffie. Check my post about unlocking game content for more information.
  So now you know where to meet players and friends, time to go kick some ass on the fields. Find Anneliese if you are at the left of the lobby and find Rebecca if you are at the right.

Press E on either of them and it will call out this menu, from top to bottom they are:
-Choose a quest from your quest list
-Choose a party that is in a quest
-Set your party settings
-Play a practice quest that teaches you how a class works
-trigger a quest with a quest trigger item
-get out from the counter


Choose the first option and there will be a list. These are different quests you can take and you may check the quest list here. I will write about the different types of quests in the next post.
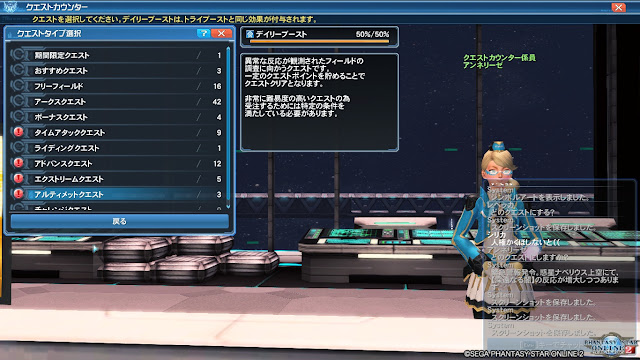
Choose any of them and you can get into the campship from here.


After getting inside you should spawn in here. The machine at the right is the storage and the left is the consumable shop.


The window on the left lets you call out NPCs to aid your quest, while the window on the right is the cooking shop and ring shops, same as those in the cafe.


There are two more machines at the back, the one at the left is the quest counter and the right is the
drink machine. Drink machine lets you to power up your character in a quest, and you can choose from different kinds of drinks in the menu. The quest counter in the campship enables players can to go on a quest marathon without leaving the campship if they wish. 


Jump down the hole at the front into the field, and refer to other guides(or the in game tutorials) of
how in field gameplay works.

After you are back from a quest you will spawn in the campship again, and you can choose to retry the quest one more time by choosing this option in the portal at the back of the campship


Thats all of this article, the next post will be about the different types of quests in PSO2.

Navigating the ARKS ship, more free storage

So after you edited your character and picked your class, you will be thrown into the story mode of PSO2, after you have finished the tutorial and some parts of the story you will be sent here. This is the bridge of the ARKS ship and you progress your story board here. In the story board you experience the story of the world of PSO2 and get rewards for progressing the story.

You get various boosts from completing the story and it is also one of the easiest ways to get your very first set of gear in this game. For example, this "weapons barrier" rewarded right at the start gives a new player enough defensive stats to support their early to mid game.
 Classes like Ranger, Bouncer, Braver, Force and Techer can get their first 9*~10* weapons from the story board too.

So you think that you're sick of the story and you wanna wander around, get out from this portal.
 Press E and you will see this menu pop out. From up to down are
-Move to gate area
-Move to shop area
-Move to casino area
-Move to Francka's cafe

The gate area looks like this after you moved out of the bridge. 
Jump down and both sides at the front are the quest counters of the game as you spawn at the back of the lobby. You accept quests here and can go start killing stuff. We will talk more about that later. The NPC in the middle is Koffie, and she is probably the single most important NPC in your early game. She gives out client orders(missions for you to accomplish) to unlock content in the game. Also, keep in mind your first 30 hours of playtime will probably be doing her client orders to unlock most of the maps you can go to.
Now turn back and keep running until you see the Class Counter like this. Here you are able to change your class, but you aren't allowed to pick a subclass yet. You will need to unlock your subclass from Koffie's orders.
 That's all of the gate area, find one of these lifts to get to the shop area.
There are various shops in the shop area(duh) but some of them are hidden at different places that you will need to know where they are. Let me explain them one by one. The orange one is the Weapons shop, the guy sells shitty weapons and the woman can do a Rare Appraisal to your special weapons, which have a "?" icon instead of a picture of the weapon. The purple shop at the right is the shop that you upgrade your gears from the NPC on the left and the right does pet stuff.
The green shop here sells consumables like Mates that recover your HP in quests, also the. The blue one sells basic costumes.
Now let your character face the entrance of the casino like this. Go up to the stairs at the left and you should see the exchange shop. The exchange shop will be important once you hit late game so keep in mind where it is.
The shops from lets to right are Photon Drop shop, Excube exchange shop, challenge mile exchange shop, shiny stone exchange shops.
Now go up to the right instead and you will see the salon. You can edit your character here and make your first support character after you unlock Koffie's order to do so. Your support character(s) will help you to complete gathering orders and help you to level up faster, details will be mentioned later(soontm).
Go back now and face your character to the big monitor. The circle below the monitor will be holding in game concerts which will happen once in a while. Some of the "lives" are at the center of the shop area like this one.
Go down and go to the left and you should see this. The entrance up there is to the cafe and the shop below are FUN shops, my room shop and weapon badges shop. Just remember that they exist for now.
Get into the Cafe next and you should see this. Welcome to the cafe and people usually go AFK here. The shops at the left are Ring shop, consumable shop and the shop that sells "food" that you can consume to power up yourself in quests. The counters at the right are the Daily order counter and quest counter. So some people want to accept their quest here so they can avoid crowds humping the counter at the gate area.
The left entrance is to the campship, the center takes you to places of the ARKS ships and the right lets you to change your block, which will be explained later. Now choose casino and you can start gambling. LOL. Jokes I'm skipping that, read this guide about the casino and have fun if you want.

Now get to the lift at the right and choose the first option to "My room", I will talk about the other options in the next article. 


After you choose to "My room" you should see this. NOTHING. 
It's up to you to decorate your room but if you
 want to have stuff like this one you would need a "My room pass" or pay cash to buy the premium package.
Turn your back and you should see this. The machine at the left lets you Craft and manage your room. The purple machine is the "Visiphone". The Visiphone lets you to access player shops to buy stuff from them, search for different players and receive stuff from SEGA. The green one is the storage that you put stuff in it since your backpack is limited to 50 spaces. You can find these two machines everywhere in the ARKS ship so you don't need to be at "My room" for managing your stuff. I recommend players to check out these guides to open up more storage spaces to be prepared for the future, because 500 spaces are definitely not enough. Other from the two guides below, players can spend IRL money to expand their storage space by Arks Cash


Now press ESC and this would show up. Refer to here and see what the menu at the bottom does. the panel at the top left is your stats like levels of your classes and exp til your next level. And then AC and SG can be purchased by Cash while SEGA sometimes give out SG for free. You can get FUN just by playing the game and Meseta below that is the main in game currency. CM is challenge miles and you get them from playing challenge quests. Also will be explained soontm.


Well thats a long article, hope you had fun and please come back for the next one about moving to different blocks and accepting quests.

Character edit and Classes

So you installed the game and chose your ship, and you now can make your own special character and play the game.

Gender and race don't really matter except for appearance, but the Cast race are quite bad casting Techniques, which are like magic in other games. Just be aware of that and you are good to go. Note that one of the end game goals in this game is playing Fashion Star Online which you buy cosmetics and play barbie with your character.

Most of these cosmetics are to be bought with AC, which you buy with real cash. SEGA being kind enough and let players sell AC items in their player shops, so you can also use Meseta(in game money) to buy those cosmetics, but they usually cost new players all the money they have. So new players are advised to upgrade their gear to a certain point and try to play barbie at the end game.

SEGA also gives out character edit passes(salon passes) time to time so you can re-edit your character when you want if you save them up.

For how to navigate the menu before editing your character, check it here.

This game has 9 different classes and after unlocking you will be able to have a main and a sub class at the same time. At the start, some classes are not available to choose, but you can change to the class you want as once as you are in the main lobby. You do not need to think for hours which class you want to play with because this game lets you change your class whenever you like at the class counter.

Main class lets the player equip the weapons/have access to skills of that class, and sub class allows the player to have access to skills and stats of the class but the player cannot equip sub class weapons.

Please refer to the Arks Visiphone wiki for more info about Classes.

Now you have picked your class, you should not skip the tutorial from the game later on, cuz this blog will skip the contents of the in game tutorials. In the next guide you will learn how to navigate around the ARKS ship, see ya

2017年2月27日月曜日

Before you start the game

So you saw the cool PSO2 gameplay/introduction videos, or those fantastic openings of the game and you want to try it out. But the game is in Japanese! If you are here reading this article you probably can't read moonrunes because you are a filthy gaijin....feels bad right?

No worries! There are a group of dedicated PSO2 players kind enough to make a translator for the game, and they have a webpage with guides on how to install the game in English, making the game into English so even gaijins can enjoy the game to the fullest.

But, too bad the account registration page is in Japanese because SEGA doesn't welcome gaijins stated in their TOS. But this guide here will help you through the process and you will be able to work it out.

Check out Arks Layer, and you should be able to install your game and start to play. Note that downloading a 45~ GB game takes a few hours at least so you are recommended to register while downloading the game.

So after you start up you see 10 different ships and such, and every one of them looks the same.

Here I list the pros and cons of each ship and new players can choose their ship to their liking:

Ship1: The try hard ship. Almost everyone got end game gears and are able to solo 12 man quests like a piece of cake. Thus the support to new players are relatively poor, but you can get mid game and near end game stuff for a low price compared to other ships because pretty much no one needs them anymore.

Ship2: The English server....no wait. Actually, the English community is just the minority but they are loud in the lobbies. The Japanese are pissed of it and they move to places which Gaijins won't bother them. But if you want to play PSO2 like an English MMORPG you should be on this ship.

Ship3: Gets the best random Emergency quests.

Ship4: The populated and try hard ship. A lot of players there and it's just crowded. It probably has 3 times more players than Ship 2 and players on Ship 4 always make different player events like cosplay gathering and time attack contests online. Also Japanese Youtubers and streamers are all on this ship. There is a small English player base there so if you like to take part in the PSO2 community it's recommended to go on Ship4.

Ship7: The Chinese server....Yeah.

Ship10: The new player ship. At least from what I know players who started the game recently like to go to ship 10. There's a small English player base at Ship 10 too.

The writer don't really know about the other ships, but feel free to explore yourself.

That's all of this article, good luck and may you enjoy your time in PSO2

Introduction of the PSO2 beginners walkthrough blog

Welcome to the blog, NoireN from Ship 2 here. This blog will not list all the details step by step like the detailed guides out there, but instead will be providing ideas and a hub to different guides for new players what to do in their first 150~200 hours of play time without getting lost. This blog will refer to http://arks-layer.com/index.php , https://pso2.arks-visiphone.com/ and other existing guides if it is necessary. Also the guides will be based on the PC version so I'm sorry Vita and PS4 players :(

In game screenshots will be in Japanese because of obvious reasons, but no worries, even if you are playing with a tweaker since the UI layout is the same anyways just follow and click around.

The writer will be updating the blog each Wednesday, so if you are a new player please check here every week :D